Request Your First Certificate
Use this guide when you are creating a new managed certificate and want to understand the full request, deployment, and renewal flow.
When you install Certify you will be prompted to register with the Certificate Authority who will validate your domains and issue your certificates (e.g. Let's Encrypt). You should provide a real email address, otherwise they can't contact you if there is a problem with your certificate.
If you are requesting a certificate for an IIS website with existing http/https domain hostname bindings it's possible to just install the app on the web server, click New Certificate, select your IIS Website and confirm your domains, then click Request Certificate to automatically validate your domain(s), fetch the certificate and auto-apply it. You can then access your website via https. Your certificate will automatically renew using the same process.
What is an ACME client?
An ACME client is any software tool which can talk to an ACME (Automatic Certificate Management Environment) enabled Certificate Authority (such as Let's Encrypt). Certify Certificate Manager is the most fully featured ACME certificate management UI available on Windows. You can see other available ACME clients here: https://acmeclients.com/
Requesting a Certificate
The basic process of requesting a certificate for your domain involves either proving you control the server for that domain or proving you control DNS for that domain, then the Certificate Authority can issue you a certificate once it's satisfied that you have met the requirements.
This process can be handled automatically, either by running the app on the web server for your domain, or by talking to your DNS service provider's API. Once a certificate has been issued it can be deployed automatically in a number of ways, the most common being to apply it to your web server https bindings
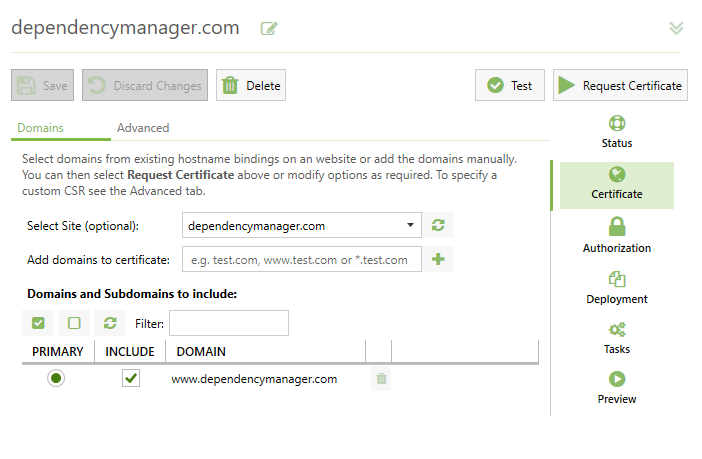
1. Choose the domains (identifiers) to include
The first step of requesting a certificate is to decide which domain (and subdomains) need to be included in your certificate. You can manually specify these or you can load the configured hostname bindings from an existing IIS site on your server.
Using existing hostname bindings in IIS is by far the easiest and quickest way to work, as working with blank hostname bindings requires more configuration (see Deployment).
Using Wildcard Domains (optional)
You can also manually add Wildcard Domains to a certificate request. A wildcard domain takes the form *.yourdomain.com and the resulting certificate would cover anything.yourdomain.com, but it will not cover nested subdomains i.e. www.anything.yourdomain.com. You will also need to add the top level yourdomain.com to the certificate if you wish to cover requests to that domain directly.
You cannot mix certificate requests for a Wildcard and a first-level subdomain (e.g. in a request for *.yourdomain.com and www.yourdomain.com, you should remove the www.yourdomain.com as it's already covered by the wildcard domain).
Wildcard certificates require DNS validation, this is a requirement imposed by the Certificate Authority.
There are also a range of other Advanced Options you can choose for your certificate, such as the preferred Certificate Authority to use, the CSR signing algorithm and the Private Key to use. Normally you can leave these as the defaults.
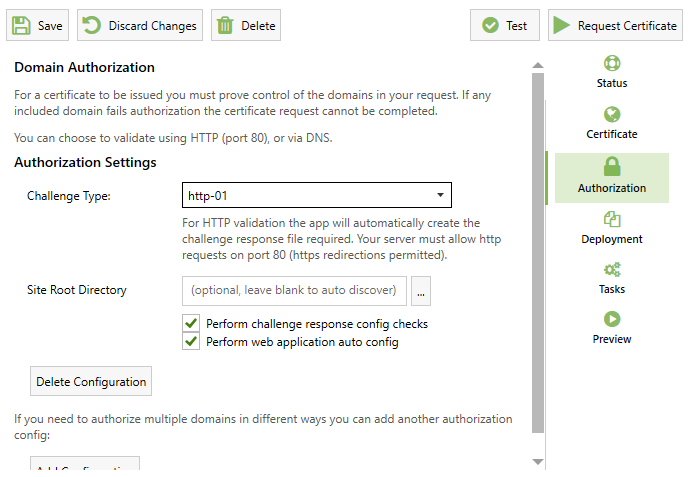
2. Decide how to validate domains
You will need to prove you control the domains you have added to your certificate. Only public domains can be validated automatically so intranet sites (where you have a private hostname only with no domain etc e.g. SRVDEVAPP01) are not supported, however public domain names (like srvdevapp01.dev.domain.com) are fine.
You can validate using HTTP validation (http-01) or DNS Validation (dns-01).
HTTP validation requires that your domain be a publicly accessible website with an http service on TCP port 80 (even if that's only for http validation purposes). You cannot use http validation if you need a wildcard certificate.
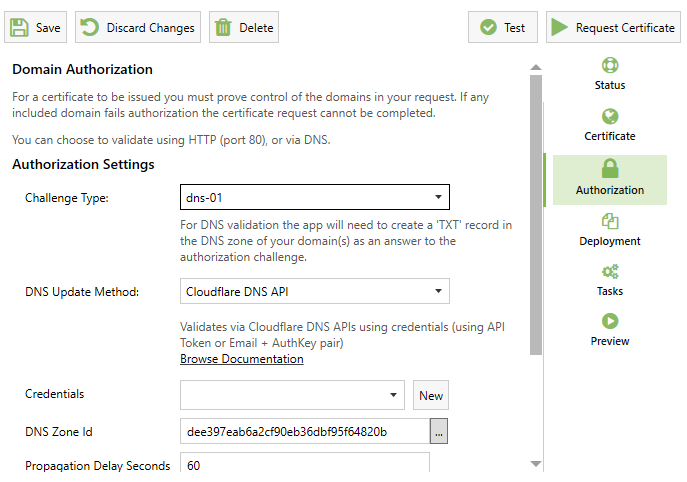
DNS validation requires that you can automatically create a TXT record in your domain's DNS zone (usually using a DNS API from a cloud DNS provider). If neither of these options are viable for you, you may not be able to use an automated certificate service.
3. Decide how to deploy
By default Certify will auto update/add https bindings on all sites with hostname bindings which match the certificate (if using IIS). You can also choose to customise how deployment occurs. The Preview feature (below) is especially important as this will show you which bindings will be created and updated.
You can customise this behaviour or even opt to have no deployment at all, however if you do customise binding behaviour (on a Windows Server) you should have a clear understanding of the limitations of SSL binding on Windows and in particular you should avoid binding to specific IP addresses unless you are fully aware of the implications. Use SNI with hostname bindings and IP set to All Unassigned instead and this is the default setting the app will auto create from existing http bindings.
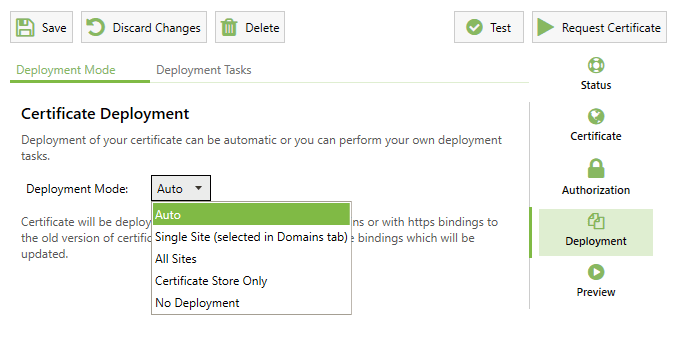
The default Auto deployment mode will (if applicable) match your certificate to all IIS http(s) sites with matching hostname bindings, to work with blank hostname bindings etc., change the deployment mode and configure the available options.
Note that for FTP site bindings you need to select "Single Site" instead.
Deployment Tasks and Advanced Usage
In addition to the Auto Deployment options, you can also make use of a variety of pre-built Deployment Tasks for local or remote deployment. You can also use scripting tasks to work with your certificate using your own custom scripting.
Deployment Tasks can be used for common certificate tasks such as deploying to Microsoft Exchange, updating a certificate in a secrets vault (such as Azure Key Vault), deploying to a CCS share or converting the certificate into different file types.
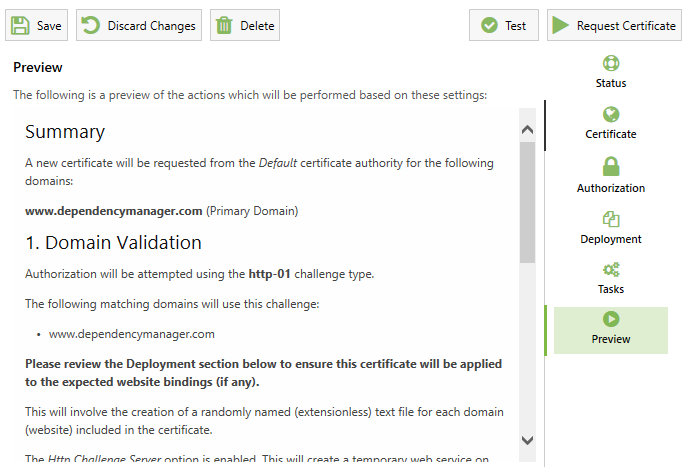
4. Preview
Using the Preview tab you can see a detailed summary of how your Managed Certificate is configured and what actions the app will plan to take next, including how the new certificate will be deployed.
5. Request Certificate
Finally, you can request your certificate which will automatically:
- Order the certificate you need (new or renewed)
- Perform the required validation
- Fetch the new certificate
- Deploy it for you (if selected).
- Run applicable Deployment Tasks (if any).
6. Automatic Renewal
By default, automatic renewal will take place after 75% of your certificate lifetime has passed. The frequency of renewals (in Days) is configurable under Settings.
The Certify background service checks for pending renewal maintenance tasks every 5 minutes and also performs daily tasks such as certificate store maintenance.
By default, if a certificate fails to renew (because of a configuration change or a problem with the certificate authority etc) then the renewal will be attempted again later. If the certificate renewal continues to fail then a status report will be sent to the certifytheweb.com API and you will then receive an email notification alerting you to the failure. The app uses the email address specified under Settings > Certificate Authorities > Accounts for this.